Organize Your Finances

credit-score-factors1
Photo Credit: Google Images

January is financial wellness month and what better way to organize your finances than with some great advice and free printables.

Amanda from Planning On It has put together this great Free Printable Notebook to Organize Your Finances in 2014

finance

Abby from Just A Girl and her blog has some free printables for Organizing Your Finances and saving more money this year.

Save-More-Money-This-Year-453x680

I found this awesome Free Cash Envelope System Template and a Tutorial! from Kelliegh at Kelliegh Ratzlaff Design.

wallet

Angie from Echoes of Laughter has a great post to help get you organized and on the right track. The Absolute Easiest Way To Track, Pay & Organize Your Household Bills…No Filing Involved!

IMG_0791

If you’re looking for a complete Home Management Binder then you will want to check out Jamie’s post over at DIY Home Sweet Home.

collage_zps219808e8

Beckah at Pinch A Little, Save-A-Lot has some Free: Money Management Essentials printable planner.

Photo1

Kayla over at Orchard Girls has some great ideas for a Monthly Bills Organization Station and FREE Printable

Bills-Monthly-Organization

If you still haven’t found a system that you think will work for you, here are some more Free Printable Budget Worksheets from Kelli the Freebie Finding Mom.

061012105101-e1339596508368

This is a great post on How to Create a Budgeting Notebook (with Printable) From Jenni Mullinix

budgeting-notebook

…and last but not least is this Budget Binder: Household Budgeting Planner from Toni at A Bowl Full of Lemons

Budget-Binder-2-ABFOL

Thanks for stopping by today and visiting with me!…

Shrimp Scampi

For our New Years Day dinner we had Shrimp Scampi and I thought I would share this delicious recipe with you today.

5

The ingredients for this dish consist of shrimp, garlic, olive oil, butter, salt, pepper and parsley. White wine is optional.

1

Of course you can use fresh shrimp, you will have to peal and devain them before they are ready for the oil and butter. If you are using the frozen shrimp like I am, rinse them in cold water to help them thaw and remove the tails.

2

Put the water on to cook the pasta and get the garlic ready by pealing and slicing it. You can use whatever kind of pasta you like but for this dish we like to use Angel Hair.

3

I start by browning the garlic in the olive oil. This is always the hardest part for me because it cooks so fast that I usually burn the it, but go slow and keep an eye on it. When your garlic is ready add in the butter and stir until it’s melted, then add your shrimp and seasonings {including the wine if you want to use it}.

4

Because the shrimp is precooked all you need to do is heat them through. Drain your pasta and you’re ready to eat!

5

Enjoy!!

Pumpkin Spice Cake Balls

Pumpkin Spice Cake Balls

A co-worker brought these Pumpkin Spice Cake Balls to work for our Halloween party and they were great so I had to give them a try. When I did a trial run they were such a huge hit around our house that I think I should make two batches for Thanksgiving.

They’re really easy to make and taste amazing! All you need is a pumpkin spice cake mix, cream cheese frosting and white melting chocolate. If you remember my Questionable Cake Pops post you will know that I’m not a “natural” when it comes to these kinds of  things but I had to give one more try and I’m so glad I did!

I couldn’t find a pumpkin spice cake anywhere so I ended up buying a spice cake and added 2 teaspoons of pumpkin pie seasoning.

Pumpkin spice cake balls1

After the cake cooled I crumbled it up into a large mixing bowl and  added about 1/4 can of the cream cheese frosting. When I had a good consistency I started rolling the balls and placing them right in the mini cupcake holders.

Pumpkin Spice Cake Balls2

Finally it’s time to melt the chocolate…my favorite part. I used a double boiler and was extra careful not to get any water in the dish. When the chocolate was the right thickness I poured it into a squeeze bottle and started swirling it on the cake balls.

Pumpkin Spice Cake Balls3

Don’t they look so cute?…

Thanksgiving Menu Planner {Free} Printable

Hey everyone, I have some really great Thanksgiving Menu Planner pages for you today and the  best part is…they’re FREE!

I found some really cute owl images and I couldn’t resist adding them to these pages. In fact, I’m thinking about using them for my blogs logo. I don’t really have a theme or a logo because I was waiting for the right inspiration and I think I found it in these cute little owls. But for now, back to the printables.

PicMonkey Collage

Thanksgiving is less than 2 weeks away…are you ready? If not I would love to help you get organized with these 3 planner pages. The first will help you plan your menu and organize your thoughts.

Thanksgiving Menu2

Download Menu Printable

The next page will help you organize your recipes and the ingredients you need to prepare them.

Thanksgiving Recipes2

Download Recipes Printable

And the final page is a shopping list so you don’t forget anything.

Thanksgiving Shopping List2

I hope these will help you get a handle on your Thanksgiving menu.

I had some last minute additions to this planner, get the extra pages here

This post has been featured on BlogHer Food

I have some really great things planned for the next few weeks and would love for you to subscribe by email or follow in some other way so you don’t miss a post. Next week I plan on sharing a Christmas card log and a worksheet to help you get your list organized and in December I will share a Christmas menu planner similar to this. So don’t miss out and subscribe using the link on the side bar.…

BOO! Witch Hat Pumpkin {re-do}

Hello ladies, The other day I shared a Halloween craft round-up that included a Black & White Glam Pumpkin from A Pumpkin & A Princess, I loved this idea so much that I had to make one for myself.

Boo Pumpkin3

This is the photo I found my inspiration from and included in my 20+ Spooky Halloween Crafts post…

Glam-Black-and-White-Pumpkin

When I went to purchase the supplies, Michael’s had all the Halloween items on sale for 50% off…including the pumpkin. Score! I found everything I needed and couldn’t wait to get home and start creating.

Boo Pumpkin1

Originally I was going to include spiders in the design but decided against it cause it kinda creeps me out a little.

I grabbed some black spray paint and headed outside with my witch hat.

Boo Pumpkin2

While that was drying out in the beautiful Fall sun I went inside to decorate the pumpkin using the BOO! stickers  that I also found on sale at Michael’s.

When the witch hat was completely dry I used hot glue to help hold the ribbon in place and to stick the leaves in the bow. Then I glued the hat in place on top of the pumpkin.

Ta-da! Here she sits  on my living room floor with some friends…

Boo Pumpkin 4

I love how this all came together with the plant in the background.…

American Flag Pallet

Happy 4th of July!!I have seen so many flags made from pallets this week that I just had to make one for myself.Doesn’t it look pretty leaning against my tree?

I live next door to a small shop that makes pallets as part of their business and I asked the owner if he would sell me a pallet and cut it down for me, which he did.This is the pallet that was waiting at my door when I got home from work Monday.At first we tried to spray paint the whole thing white…epic fail!The spray paint soaked right in, we would have needed ten cans lol.

So…back to the store for paint.I made sure to get oil based paint. That would be just like meto get water based paint and have it all wash away during the next rainstorm.

After it was painted white and that had dried, I measured and taped it off to paint the red.

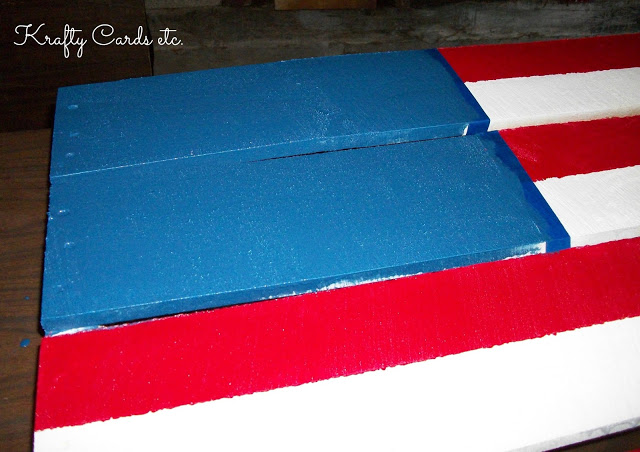
We had a lot of rain this week so I had to move the project into the garageplus it was much easier to work on a table.After the red had dried I taped off the area for the blue and painted that.

I missed a couple spots in this picture but they were fixed after.inally, this morning I was able to paint the stars.I wasn’t sure how to lay the starts out so I could have all 50 on the flag.I tried to draw them out with a white crayon but that just made a messso I just tried it with the paint brush.

Some stars look really good and others not so good.I did manage to get all 50 even if they are not all the same size or in the correct place.Thanks so much for visiting Krafty Cards etc. Have a happy 4th of July!